Tuesday 27 June 2017

Connecting Melody Line and Rhythm Chords

What is the relationship between the melody line and the rhythm chords?


Mix It Up

Don't just use chord tones (meaning, notes that are in the chord you're playing at the moment) and don't just use non-chord tones. Non-chord tones will give your melody a sense of momentum and tension, while chord tones will give your melody a sense of stability and release. Of the chord tones, roots and fifths have the most stability, while thirds and sevenths strike a nice balance. 
Too much of either is no good: too much tension and momentum, and you run the risk of your melody running out of control, which ultimately feels chaotic. Too much stability, and your melody will sound dull and boring.

Voice Leading

This basically means that your melody shouldn't jump around too much---a few big intervals are fine and can be really dramatic, but most of the time, your melody should stick to stringing together notes that are near each other. Otherwise it's hard for the listener's ear to keep up.
For example, say you're playing the A-D-E chord progression you mentioned. C# is the third of the A chord, and D is the root of the D chord (obviously). So a melody that plays the C# and then the D is employing voice leading.

Choosing Chords

So you have the opposite challenge: to pick chords to fit a melody. As before, there's no one right way to go about this, but again, here are some guidelines:
  • Identify the notes in the melody that feel more stable as opposed to those that feel as though they have momentum and movement and use those to help inform your chord choices.
  • Identify the few notes with the most drama. These probably shouldn't be chord tones, but might resolve to chord tones.
  • Chord progressions have their own momentum and stability. I chords are stable; V chords have momentum. You resolve a V (or V7) chord to its corresponding I chord. Unless you absolutely know what you're doing, make sure your V chords resolve or the song will leave your listeners feeling unsettled.

Example: "Eleanor Rigby"

"Eleanor Rigby"---"Rig" and "by" are both chord tones, and the melody lands on "by" like a rock. That note is the root of the chord, and it provides a lot of stability for the melody, which is good because the next line is...
"Picks up the rice in a church where a wedding has been"---"Rice" and "church" aren't chord tones, and they have a lot of momentum. This line is almost like a roller coaster: "Picks up the" is the initial ascent, followed by a briefly held point of tension on "rice", then a quick fall, a quick rise, and then another briefly held point of tension on "church", another fall, etc. It ends on "been", which is a chord tone for the next chord (the IV chord). Stability and release after the tension and drama of the roller coaster. Paul knew what he was doing.

Summary

These are only techniques and ideas on how you could come up with fitting tunes and chords. However, ultimately you need to be happy with the music created - simple or complex. 


BlueTimbre is a Music Company with Music Education spaces, Jam Room and Recording studio located in India. BlueTimbre provides complete end-to-end Music Education solutions for schools. The BlueTimbre team comes with decades of cumulative experience in running structured businesses, music curriculum development, music education and performance.


Source
https://music.stackexchange.com/questions/2595/what-is-the-relationship-between-the-melody-line-and-the-rhythm-chords

Tuesday 20 June 2017

How Children Benefit from Music Education in Schools

Research tells us children who play music do better in school and in life. Yet, there is so much debate about whether arts should be included in schools. The arts in education campaign has been ongoing for some years now and will always be a controversial topic for many. Should we or should we not provide our students with an opportunity to explore the arts in school? Should we include the arts in the school day or make them extracurricular? Should we incorporate arts education lessons and activities in the general classroom? Will the arts have a great effect on academic excellence? 

These are all questions that have crossed several great minds in the past, but the real question I have is, "why the controversy?" After all of the scientific research that has been collected, is it not proof enough that the arts and music in the classroom has a tremendous effect on world-wide academic achievement and cultural value?


Here is a list of the 5 most important reasons why music education is so beneficial to our students:

  1. A Music Education program provides an aesthetic experience for its students. Often times, students will utilize music as an outlet for expression that is sometimes unavailable to them in other academic areas.
  2. Musical experiences will provide the students with opportunities for emotional response, which often encourages the cognitive processes.
  3. Music Education instills “life values" in students. Some of these include; discipline, cooperation, social skills, and building good character. Knowledge of music technology, music history, music theory, and music culture will reinforce knowledge in other academic subjects as well.
  4. Music will often create a sense of school spirit, which will in turn provide the students with a sense of self-worth which will almost always reflect a positive attitude.
  5. A good Music program will aid any school district in the direction to obtain the highest level of achievement and excellence deemed possible.

So don't compromise, ensure your child has access to quality Music Education in school. Ensure you child is learning music correctly - learning the language of music, reading and writing music, techniques of the instrument chosen and finally the ability to perform using the skills learnt in the music class.


BlueTimbre is a Music Company with Music Education spaces, Jam Room and Recording studio located in India. BlueTimbre provides complete end-to-end Music Education solutions for schools. The BlueTimbre team comes with decades of cumulative experience in running structured businesses, music curriculum development, music education and performance.


Sources:
http://www.brighthubeducation.com/teaching-elementary-school/11235-importance-of-music-education/?platform=hootsuite
http://blogs.edweek.org/edweek/curriculum/2017/04/arts_education_research.html?cmp=eml-enl-eu-news3
https://www.nammfoundation.org/articles/2014-06-09/how-children-benefit-music-education-schools


Tuesday 13 June 2017

More Essential Drum Rudiments

Drum Rudiments are the most important aspect to learning drumming. They are the building blocks to every drum beat, pattern, fill, and solo. They are the fundamentals to all percussion, and should not be ignored. A drummer should know all of the key drum rudiments, and be able to perform them without hesitation. Without the practice of these, you are limiting your skills and opportunity as a drummer. Let’s break this down a bit, and look at why drum rudiments are so important to practice.

What Is A Drum Rudiment?

A drum rudiment is basically a sticking pattern. Every sticking pattern you play on the drum set is derived from different drum rudimentsDrum rudiments are basic drum patterns, used as practice exercises. They are basically the foundation of drumming, or the basics of stick control, and wrist movement. There are many different rudiments out there. You may hear some people talking about the 40 essential drum rudiments. This may seem like a lot however, most of these are just variations of each other. Drum rudiments should be practiced on a practice pad or a snare drum. They simply help train your fingers and wrists with speed, power, control, as well as independence. . Most are very common patterns that you are well aware of like the single stroke roll, double stroke roll, and flam stroke. Some are more complex and difficult to play.


Why Are Drum Rudiments Important?

Practicing your drum rudiments as a drummer is a lot like going to the gym as a professional athlete. The same is for a drummer – we must train our muscles to hit harder, more accurate, and faster. This is where drum rudiments come into play. They force us to do nothing else but practice stick movement. A lot of times drummers will get side tracked on a drum kit and lose out on valuable practice time. Going through the basic exercises will drastically improve your skills on the drum set; allowing you to roll a lot faster, and giving you more options on the drum set.

Pros and Cons of Practicing Rudiments

To be honest, there are not a lot of cons to practicing these drum rudiments. As a drummer, you should be practicing these drum rudiments more often then you practice on a drum set. You can never go wrong by practicing your essential drum rudiments. The good thing about these is it will force you to go back to the core of drumming. It is easy to get distracted with the drums in front of you, but when you are using a practice pad working on your rudiments, you do not have that option. However, that could also be a problem. Some may get used to the practice pad, and find it hard to transfer back to the drum set. Another problem with rudimental practice is it does not work on creativity, and independence on the drum set. Being limited to a single pad, you are unable to hear the different drum voices, thus hindering your creative edge.

Summary

Practicing these drum rudiments are very important. The best way to practice these is to take a pair of drum sticks, a metronome, and a practice pad and start playing. Make sure you are playing with a metronome to keep yourself on time. If you do not know where to start, here is a list of the top 5 rudiments you should start with: the single stroke roll, the double stroke roll, the flam stroke, the paradiddle, and the double paradiddle. These are the top 5 rudiments you should start with, as each one will teach you speed, control, independence and endurance on your sticks. Make sure you read up on these essential practice tips before you begin playing these rudiments; it will help you out a lot! 

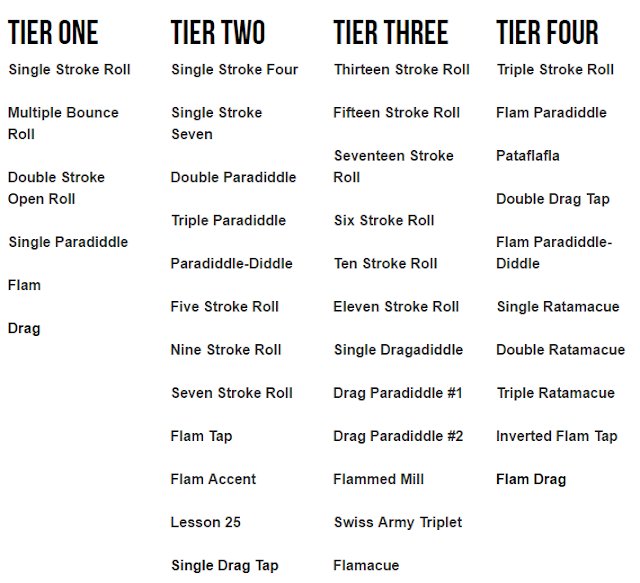
Here are some of the more drum rudiments divided by ease of playing:


Most of the drum rudiments are variations of each other, meaning it is not too hard to learn all 40 rudiments. For example, if you can play a flam stroke, and a paradiddle pattern, you should have no trouble playing the flam paradiddle. In any case take the time to go over each one if you can. 


BlueTimbre is a Music Company with Music Education spaces, Jam Room and Recording studio located in India. BlueTimbre provides complete end-to-end Music Education solutions for schools. The BlueTimbre team comes with decades of cumulative experience in running structured businesses, music curriculum development, music education and performance.


Source: http://vicfirth.com/40-essential-rudiments/


Tuesday 6 June 2017

6 Ways to Change Chords Easily

For most beginner guitar players all they want to do is to play an easy song. To do this you need a couple of things:
A guitar, some chords, a strumming pattern and a smooth chord transition. The latter can be the tricky part.
Changing chords while maintaining a steady rhythm pattern is the biggest challenge on the path of the beginner guitar player. It’s often a struggle and hard work to make the chord transition sound good. It almost feels like it’s something that can not be done, but nothing could be further from the truth. 
Here are some tips to help get you started:
1. Work on chords first
Before you start changing chords, first focus on perfecting your chords and chord movement.
– Learn the 8 most important chords for beginners (C, A, G, E, D, Em, Am, Dm)
– Work on each chord separately.
– Visualize the shape of the chord.
– Place your fingers in the shape of the chord and try to move all your fingers simultaneously.
– Land all your fingers on the strings at the same time (press with the very tips of your fingers).
– Remove your hands from the strings and repeat the exercise 10 times.
– Try it with a different chord each time.

2. Make use of pivot fingers
When you want to switch between two chords there is often one finger that both chords have in common. This finger can be left on the same string and fret. It doesn’t need to leave the string when you’re moving to the next chord. This is what we call the pivot finger. It will give you support while you move your other fingers around it and into the right position of the next chord.
If you go from “C” to “Am” you can see there are two fingers that won’t have to leave the strings. You only have to move one finger.
3. Train your muscle memory.
This is a great exercise. Play a chord and strum it once. Lift your fingers off the strings while keeping the shape of the chord. Now place your fingers back on the strings and strum it again. Take them off again… and put them back on. Practice this for two minutes. Try it with a different chord.
4. Basic strumming pattern
Once you’ve practice your chords thoroughly and you can place your fingers on the strings almost simultaneously, it’s time to add a basic strumming pattern.
Start with the following basic strumming pattern and play it slowly:
C chord: down-up-down-up-down-up-down-up
Am chord: down-up-down-up-down-up-down-up
C chord: down-up-down-up-down-up-down-up
Am chord: down-up-down-up-down-up-down-up
Play a C chord and add the strumming pattern above. Now on the last up-stroke of your strumming pattern (see the last underlined “up”) only lift the fingers that you need to move for the next chord off the strings. Here’s where make the chord transition. Try not to overemphasize this last up-stroke so you can make a smooth transition to the next chord.
Make sure your fingers are back on the strings on the first down-stroke of your next chord. Now repeat the strumming patten on the Am chord. Again lift your fingers on the last up-stroke when you make the switch to the next chord.
Keep your strumming pattern at a steady but slow tempo all the way through.
Once you feel comfortable playing this chord transition try a more challenging one, like “C” to “Em” or “D” to “G”. The same principles applies to all chord changes. Practice switching chords for a few minutes and multiple times a day.
You can also try a more complicated strumming pattern when you’re up for it. Start slow at all times. Do not rush, You want to keep observing your fingers while you’re making the switch from one chord to another so you can learn from it and improve where possible.
5. Keep the rhythm going
The moment you want to switch chords during your strumming pattern your right hand probably stops, because your left hand can’t keep up yet and needs time to make the switch. This is something you have to practice.
You have to keep your strumming pattern at a slow and steady pace and force your fingers of the other hand to make the switch to the next chord while you keep the rhythm going at steady pace. Don’t stop the strumming. You have to train yourself to do both actions (strumming and switching) simultaneously.
Again play slow so you have time to think about what you’re doing. If you’re going to fast you can’t make it work. Speed comes later.
6. Practice daily
Repetition is the key to improvement. Practice daily and with focus. Be patient, it takes some time to get this under your fingers but you will get there definitely. Just keep at it. It will be the best thing ever.
A smooth transition of changing chords is something that does take time and effort, but with the right tips and tricks you will get there a lot faster and make it work as it should.
BlueTimbre is a Music hub with Music Education spaces, Jam Room and Recording studio located in India. BlueTimbre provides complete end-to-end Music Education solutions for schools. BlueTimbre management team comes with a decades of cumulative experience in running structured businesses, music curriculum development, music education and performance.

Sources:

http://www.guitarhabits.com/10-effective-ways-to-change-chords-easily/#
http://www.guitarhabits.com/the-8-most-important-open-guitar-chords-for-beginners/